Configuring SAML SSO for WhosOnLocation

These steps will guide you through setting up the single sign-on functionality between ADSelfService Plus and WhosOnLocation

Prerequisite

  1. Log in to ADSelfService Plus as an administrator.
  2. Navigate to  Configuration → Self-Service → Password Sync/Single Sign On → Add Application, and select WhosOnLocation from the applications displayed.
    Note: You can also find WhosOnLocation application that you need from the search bar located in the left pane or the alphabet wise navigation option in the right pane.
  3. Click IdP details in the top-right corner of the screen.
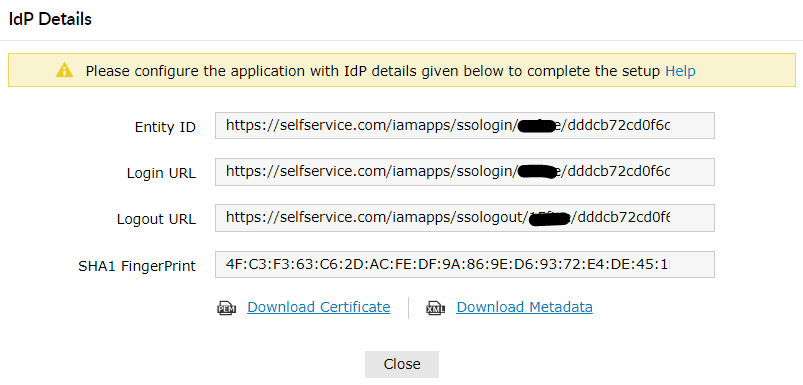
  4. In the pop-up screen that appears, copy the values of Login URL and FingerPrint. We will need these values in later steps.

  5. Note: You could also download the SSO certificate and use its content instead of the FingerPrint.
    IDP Details

WhosOnLocation (Service Provider) configuration steps

  1. Now, log in to your WhosOnLocation administrator account.
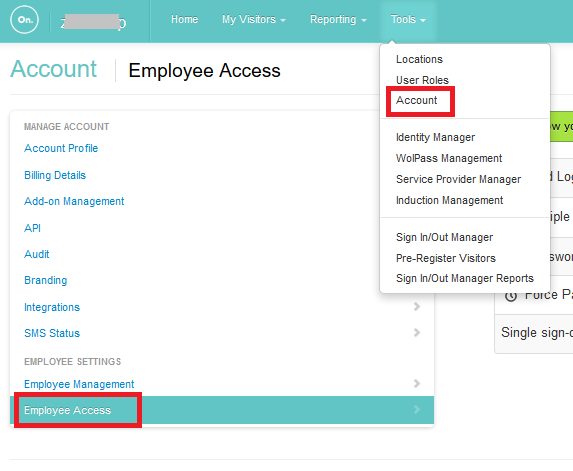
  2. Navigate to Tools → Account → Employee Access

    Screenshot
  3. Toggle the Single sign-on with SAML switch to Yes. This will display the SAML Configuration fields.
  4. In the Issuer URL and SSO Endpoint, enter the Login URL value that you had saved in Step 4 of Prerequisite.
  5. In Certificate/Fingerprint field, enter the FingerPrint value that you had saved in Step 4 of Prerequisite.
  6. Click Save SAML Configuration.
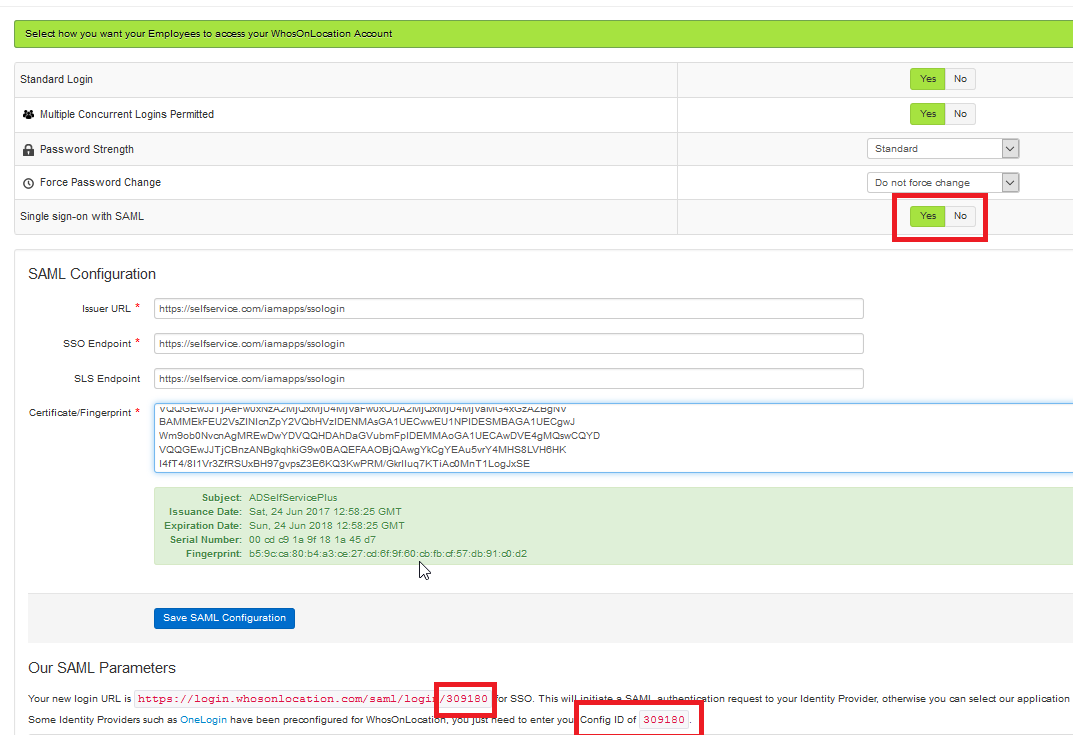
  7. Under the Our SAML Parameters section, copy the Config ID value. This value will serve as the input for the Config ID field in ADSelfService Plus

    Screenshot

ADSelfService Plus (Identity Provider) configuration steps

  1. Now, switch to ADSelfService Plus’ WhosOnLocation configuration page.
  2. Enter the Application Name and Description.
  3. In the Assign Policies field, select the policies for which SSO need to be enabled.
    Note:ADSelfService Plus allows you to create OU and group-based policies for your AD domains. To create a policy, go to Configuration → Self-Service → Policy Configuration → Add New Policy.
  4. Select Enable Single Sign-On.
  5. Enter the Domain Name of your WhosOnLocation account. For example, if you use johndoe@thinktodaytech.com to log in to WhosOnLocation, then thinktodaytech.com is the domain name.
  6. In the Config ID field, enter the Config ID value you had copied in Step 7 of WhosOnLocation configuration.
  7. Choose the Name ID format that has to be sent in the SAML response. The Name ID format will specify the type of value sent in the SAML response for user identity verification.
  8. Click Add Application
  9. Your users should now be able to sign in to WhosOnLocation Online through ADSelfService Plus.

    Note: For WhosOnLocation,both IdP-initiated and SP-initiated flows are supported.
    SP flow could be initiated by accessing portal : https://login.whosonlocation.com/saml/login/ [ Config ID ]

Copyright © 2024, ZOHO Corp. All Rights Reserved.