Configuring SAML SSO for Microsoft 365

These steps will guide you through setting up the single sign-on functionality between ADSelfService Plus and Microsoft 365. 

Link Microsoft 365 and on-premises Active Directory user accounts

  1. Using Azure AD Connect

    • GUID as sourceAnchor: If you have Azure AD Connect, then use it to update the sourceAnchor attribute in Microsoft 365 with AD’s GUID attribute value.
    • Other unique AD attribute as sourceAnchor: If you have already assigned a different attribute value other than GUID for the sourceAnchor attribute, then use the Account Linking option in ADSelfService Plus to map it with the corresponding attribute in Active Directory.
  2. Using a third-party GUID to ImmutableID converter tool

    • Convert GUID to ImmutableID: If you don’t have Azure AD Connect, then you can download a third-party ‘GUID to ImmutableID converter’ tool. Use the tool to convert the GUID value of each user to ImmutableID values and update them in Microsoft 365.
    • Update the ImmutableID value in Microsoft 365: Once you have converted the GUID to ImmutableID, you need to update the value in Microsoft 365 for each user using the PowerShell commands given below.
      Command to update ImmutableID attribute while creating new users

      $cred = Get-Credential
      Connect-MsolService -Credential $cred
      New-MsolUser -UserPrincipalName "user01@mycompany.com" -ImmutableId "<immutable_id>" -DisplayName "user 01" -FirstName "user" -LastName "01" -LicenseAssignment "<service_pack>" -UsageLocation "<location>"

      Note: You can check whether the update was successful using this command: Get-MsolUser -All | select userprincipalname,ImmutableId
      Command to update ImmutableID attribute for existing users

      Set-Msoluser -UserPrincipalName "<user_mailID>" -ImmutableID “<immutable_id&gt ”

Prerequisite

  1. Login to ADSelfService Plus as an administrator.

  2. Navigate to  Configuration → Self-Service → Password Sync/Single Sign On → Add Application, and select Microsoft 365 from the applications displayed.
    Note: You can also find Microsoft 365 application that you need from the search bar located in the left pane or the alphabet wise navigation option in the right pane.
  3. Click IdP details in the top-right corner of the screen.
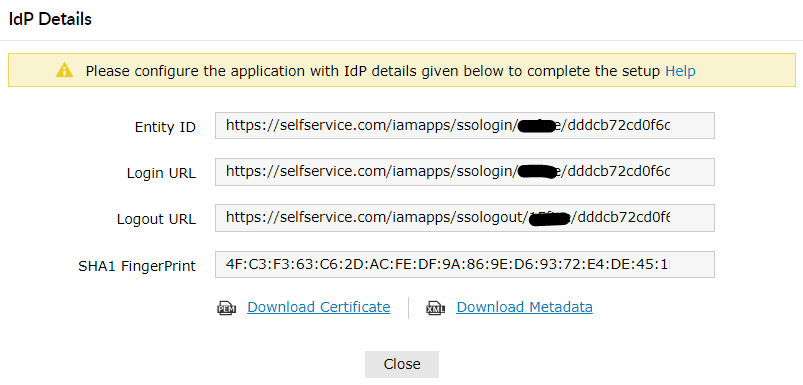
  4. In the pop-up that appears, copy the Login URL and download the SSO certificate by clicking on the Download SSO Certificate.

  5. Screenshot

Microsoft 365 (Service Provider) configuration steps

  1. Open Powershell with Admin rights.
  2. Enter the below command. In the pop-up that appears, enter username and password of your Microsoft 365 administrator account.

    $cred = Get-Credential

  3. Connect with MsolService using the following command.

    Connect-MsolService -Credential $cred
    Get-MsolDomain

    This command will show a list of domains.
  4. Enter the domain for which you would like to enable SSO.

    $dom = "mycompany.com"

  5. Enter the Login URL value from Step 5 of Prerequisite for $url and $uri commands, and Logout URL value for $logouturl command.

    $url = "<login URL value>"
    For example, $url = "https://selfservice.com:9251/iamapps/ssologin/office365/1352163ea82348a5152487b2eb05c5adeb4aaf73"
    $uri = "<login URL value>"
    For example, $uri = "https://selfservice.com:9251/iamapps/ssologin/office365/1352163ea82348a5152487b2eb05c5adeb4aaf73"
    $logouturl = "<logout URL value>"
    For example, $logouturl = "https://selfservice.com:9251/iamapps/ssologout/office365/1352163ea82348a5152487b2eb05c5adeb4aaf73"

  6. Now copy the SSO Certificate file content (from Step 5 of Prerequisite) and past it as the value fo the below command.

    Important :

    Please edit the file so that there aren't any new line before you copy the content.

    $cert = "MIICqjCCAhOgAwIBAgIJAN..........dTOjFfqqA="


    Screenshot
  7. Run the below command to enable SSO in Microsoft 365.

    Set-MsolDomainAuthentication -DomainName $dom -FederationBrandName $dom -Authentication Federated -PassiveLogOnUri $url -SigningCertificate $cert -IssuerUri $uri -LogOffUri $logouturl -PreferredAuthenticationProtocol SAMLP

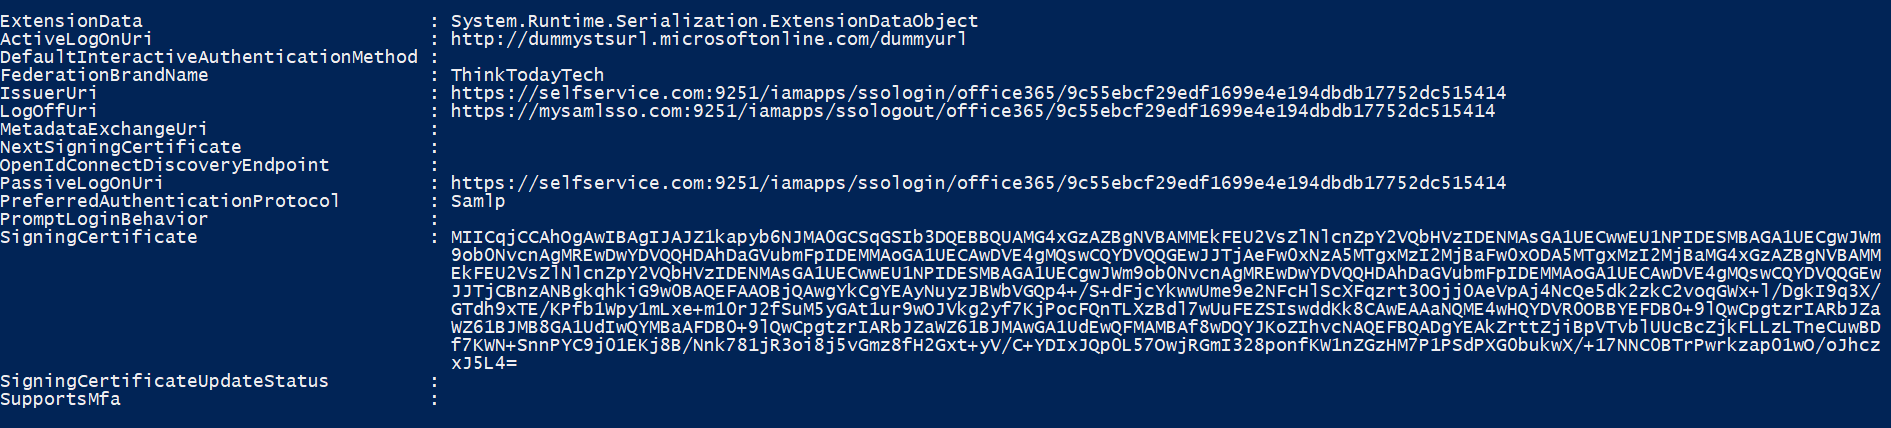
  8. To test the configuration, use the following command.

    Get-MSolDomainFederationSettings -DomainName "mycompany.com" | Format-List *


    Screenshot
  9. Reconfigure or update SSO settings: If you are already using SSO for Microsoft 365 from another identity provider or want to update ADSelfService Plus SSO settings, then you must first disable SSO in Microsoft 365, and then follow the steps in this guide. To disable SSO in Microsoft 365, use the command given below:

    $dom = "mycompany.com"
    Set-MsolDomainAuthentication -DomainName $dom -FederationBrandName $dom -Authentication Managed

ADSelfService Plus (Identity Provider) configuration steps

  1. Now, switch to ADSelfService Plus’ Microsoft 365 configuration page
  2. Enter the Application Name and Description.
  3. In the Domain Name field, enter the domain name you used in Step 4 of Microsoft 365 configuration.
  4. In the Assign Policies field, select the policies for which SSO need to be enabled.
    Note:ADSelfService Plus allows you to create OU and group-based policies for your AD domains. To create a policy, go to Configuration → Self-Service → Policy Configuration → Add New Policy.
  5. Select Enable Single Sign-On.
  6. Choose the Name ID format that has to be sent in the SAML response. The Name ID format will specify the type of value sent in the SAML response for user identity verification.
  7. Click Add Application
Note: For Microsoft 365, single sign-on is supported for SP and IdP initiated flow.
Go to Top

Copyright © 2024, ZOHO Corp. All Rights Reserved.